A hand router is a versatile tool used in woodworking to hollow out an area of a hard material like wood or soft metals. Understanding the assembly and placement process of hand router parts can help you use the tool effectively and maintain it properly. Here’s an overview of the key components and their assembly in a typical hand router.
Hand Router Parts Introduction
As it was mentioned, a hand router is an incredibly useful tool for woodworkers, and understanding its parts can greatly enhance its use.
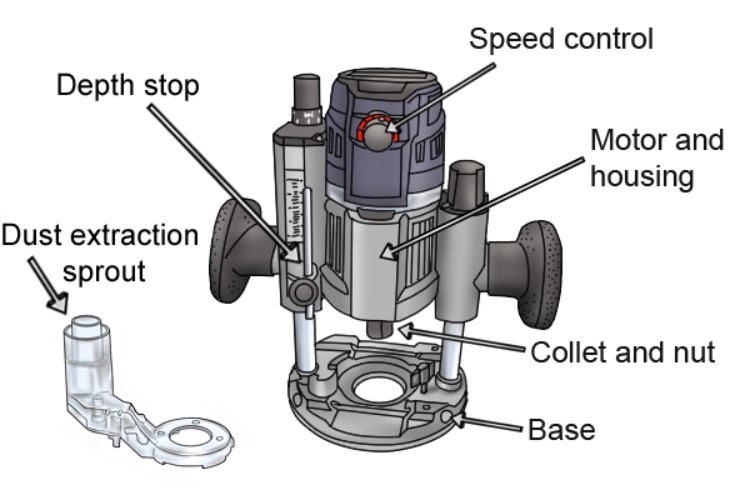
The Motors
At the core of this machine is the motor, which acts as the powerhouse to drive the router bits at varying speeds depending on its horsepower or wattage. A more powerful motor means the ability to cut through tougher materials swiftly for smoother and more efficient woodworking tasks.
The Spindle
The spindle is the rotating shaft that securely holds and spins the router bit. It’s centered within the motor and is essential for the precision work that routers are known for as it ensures that the bit turns at the right speed to achieve clean, accurate cuts.
The Collet
The collet, this hand router part, plays a vital role in this process by firmly gripping the router bit to the spindle. Available in various sizes, collets ensure that different bit shank diameters can be securely attached for more versatility in the types of cuts and designs you can create.
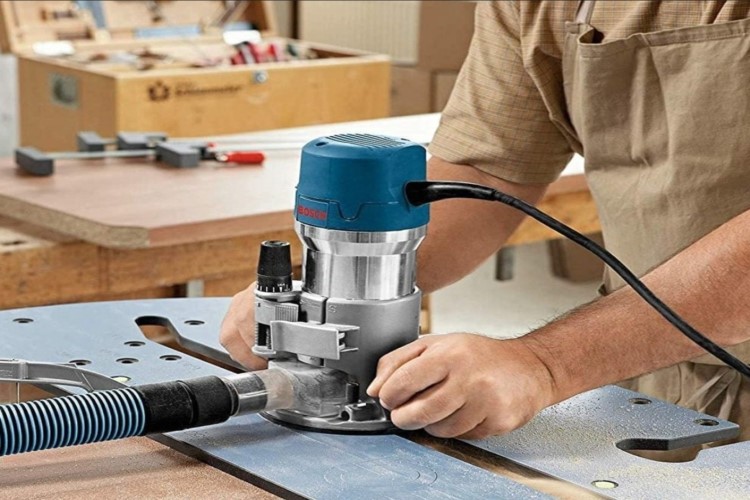
The Base
The base of the router is critical for stability and control while operating the tool. Depending on the design, a router may have a fixed base, which stays stationary for tasks like edge trimming, or a plunge base that allows the user to lower the bit into the material gradually, perfect for creating recesses or pockets.
The Depth Adjustment Ring
The depth adjustment ring is another hand router part, enabling woodworkers to control precisely how deep the router bit will cut into the material, allowing for uniformity in depth across multiple cuts.
The On/Off Switch
Power management is facilitated by the on/off switch to help the user to start and stop the motor easily. Some switches also incorporate variable speed controls for further customization in operation. The power cord simply supplies electricity to the router, essential for its function.
The Depth Stop
To maintain consistent cutting depths, the depth stop is used to limit how far down the bit can be cut to ensure a uniform finish.
The Plunge Mechanism
For routers designed with advanced features, this hand router part enables the bit to be delicately lowered into the workpiece, often with a locking feature that secures the bit at a chosen depth.
The Sub-Base
An optional sub-base can be attached for additional protection against scratches to your workpiece and can be customized for specific routing tasks.
The Dust Collection Port
A dust collection port is another optional feature that connects to a vacuum system to keep your workspace clean by removing dust and debris generated during routing to improve both visibility and safety.
The Handles
The handles on the router are crucial for control during operation; depending on the size of the router, this hand router part may come with a single handle or two handles for greater maneuverability. This ergonomic design aids in maintaining a steady hand while you work.
The Assembly Process of Hand Router Parts
Here is how to assemble the parts in easy steps:
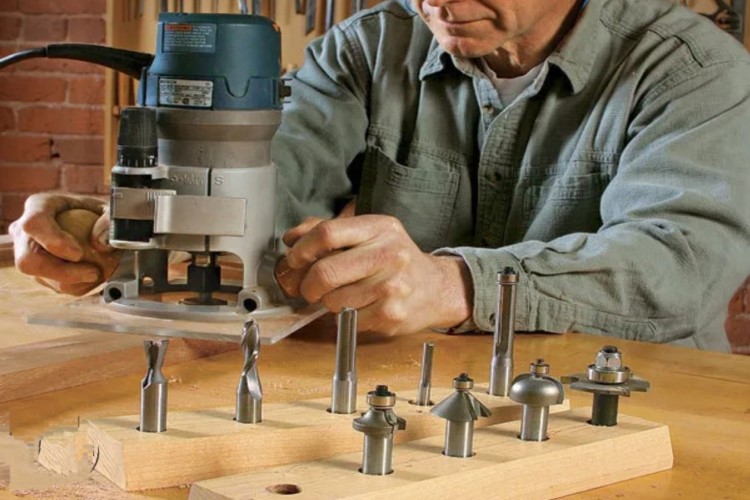
Attaching the Router Bit
First, select the router bit that best suits your project’s requirements. Next, insert the shank of the chosen bit into the collet. Then, tighten the collet securely using the spindle lock and a wrench if necessary. This ensures the bit remains firmly in place throughout the operation to prevent any potential loosening and ensure safety.
Installing the Base Plate
If your router utilizes a detachable base plate, begin by aligning it precisely with the motor housing. Subsequently, secure this hand router part in place using the provided screws or clamps. It is crucial to ensure there are no gaps between the base plate and the motor housing, as this could compromise the router’s stability and potentially lead to inaccurate cuts or even accidents.
Setting Depth of Cut
To set the desired cutting depth, utilize the depth adjustment mechanism provided on your router. This typically involves turning a knob or sliding a lever until the desired depth is reached. If applicable, lock the mechanism in place to maintain the chosen setting throughout the operation.
Adjusting Speed Settings
If your router features a variable speed setting, adjust it appropriately based on the material you will be working with. Generally, softer materials require higher speeds for efficient cutting, while tougher materials may necessitate slower speeds to prevent the bit, the most important hand router part, from overheating or breaking.
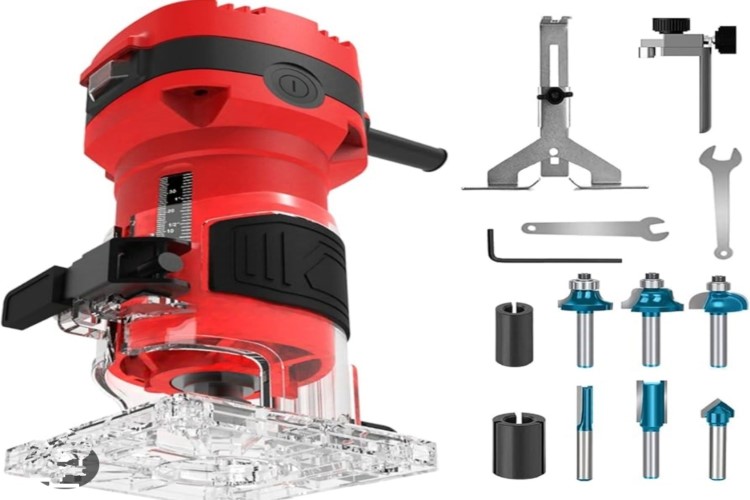
Attaching Additional Accessories
If your project requires the use of guide wheels or a fence, attach them according to the manufacturer’s specific instructions. These accessories are invaluable in ensuring straight and accurate cuts for the overall quality of your work.
Checking the Power Cord
Before the operation, carefully inspect the power cord for any signs of damage, such as frays or cuts. Ensure the cord is in good condition and then safely plug it into a reliable power source.
Operational Safety Check
Before use, conduct a thorough check of all components to confirm they are securely fastened and functioning correctly. It is crucial to prioritize safety by wearing appropriate protective gear, including goggles and a dust mask, to safeguard yourself from potential hazards.
The Placement and Usage of Router Parts
The right placement of hand router parts can enhance your woodworking projects and ensure your safety while using the tool.
Positioning
Begin by securely placing the router on the workpiece and ensuring the base plate maintains consistent contact with the material. Maintain a firm grip on the router using both hands, preferably utilizing the provided handles for better control.
Starting the Router
Switch on the router and allow it to reach its full operating speed before engaging it with the material.
Making Cuts
Guide the router steadily and smoothly through the material, allowing the bit to perform the cutting action without exerting excessive force. Accurately follow your pre-marked lines or utilize a guide for precise cuts.
Finishing Up
Once the desired cutting depth is achieved and the pass is completed, switch off the router and allow it to come to a complete stop before setting it down.
Maintenance
After each use, thoroughly clean the hand router part and inspect the bits and collets for any signs of wear or damage. Store the bits and other components properly in a designated safe location.
Conclusion
To sum up, as a user of a router, you need to know all the hand router parts, how to assemble and use them properly. Then, you will make precise cuts and get the piece you wish as a result. For the best selection of high-quality hand router components, consider Maple CNC as your trusted source.